Mathpix Markdown 语法参考
内联数学
内联数学可以使用
$TeX$ 或 \( TeX \) 分隔符表示。示例:
Compute \(f(x) = x^2 + 2\) if \(x=2\).
Compute
Newton postulated that $\vec { F } = m \vec { a }$.
Newton postulated that
块模式数学(非数字)
分隔符:
$$...$$LaTeX 示例:
$$
x = \frac { - b \pm \sqrt { b ^ { 2 } - 4 a c } } { 2 a }
$$
渲染方程:
分隔符:
\[...\]LaTeX 示例:
\[
y = \frac { \sum _ { i } w _ { i } y _ { i } } { \sum _ { i } w _ { i } } , i = 1,2 \ldots k
\]
渲染方程:
分隔符:
\begin{equation*}...\end{equation*}LaTeX 示例:
\begin{equation*}
l ( \theta ) = \sum _ { i = 1 } ^ { m } \log p ( x , \theta )
\end{equation*}
渲染方程:
分隔符:
\begin{align*}...\end{align*}LaTeX 示例:
\begin{align*}
t _ { 1 } + t _ { 2 } = \frac { ( 2 L / c ) \sqrt { 1 - u ^ { 2 } / c ^ { 2 } } } { 1 - u ^ { 2 } / c ^ { 2 } } = \frac { 2 L / c } { \sqrt { 1 - u ^ { 2 } / c ^ { 2 } } }
\end{align*}
渲染方程:
Block mode math (numbered)
分隔符:
\begin{equation}...\end{equation}LaTeX 示例:
\begin{equation}
m = \frac { m _ { 0 } } { \sqrt { 1 - v ^ { 2 } / c ^ { 2 } } }
\end{equation}
渲染方程:
Align, split, gather equation environments
分隔符:
\begin{align}...\end{align}LaTeX 示例:
\begin{align}
^{|\alpha|} \sqrt{x^{\alpha}} \leq(x \bullet \alpha) /|\alpha|
\end{align}
渲染方程:
分隔符:
Reason to use: split your equation into smaller pieces
\begin{split}...\end{split}Reason to use: split your equation into smaller pieces
LaTeX 示例:
\begin{split}
a& =b+c-d\\
& \quad +e-f\\
& =g+h\\
& =i
\end{split}
渲染方程:
- Use
\\to denote a new line and&to denote where the lines should align. - Need it numbered? Wrap it in
\begin{equation}...\end{equation}
分隔符:
Reason to use: for displaying a set of consecutive equations that don’t require special alignment
\begin{gather}...\end{gather}Reason to use: for displaying a set of consecutive equations that don’t require special alignment
LaTeX 示例:
\begin{gather}
a_1=b_1+c_1\\
a_2=b_2+c_2-d_2+e_2
\end{gather}
渲染方程:
分隔符:
Reason to use:
\begin{gather*}...\end{gather*}Reason to use:
gather environment without an equation numberLaTeX 示例:
\begin{gather*}
a_1=b_1+c_1\\
a_2=b_2+c_2-d_2+e_2
\end{gather*}
渲染方程:
公式引用
您可以使用
\label{}、\ref{} 和 \eqref{} 链接到文档中的任何编号公式:In equation \eqref{eq:1}, we find the value of an
interesting integral:
\begin{equation}
\int_0^\infty \frac{x^3}{e^x-1}\,dx = \frac{\pi^4}{15}
\label{eq:1}
\end{equation}
\begin{equation}
\| x + y \| \geq | \| x | | - \| y \| |
\label{eq:2}
\end{equation}
Look at the Equation \ref{eq:2}
In equation (5), we find the value of an
interesting integral:
interesting integral:
查看公式 6
除了使用编号块模式公式语法进行标准编号(即 1、2、3)外,您还可以在 LaTeX 分隔符内使用
\tag{} 来创建自定义标签。请注意,如果在编号公式中使用 \tag{},它将覆盖文档的编号。$$
\frac{x\left(x^{2 n}-x^{-2 n}\right)}{x^{2 n}+x^{-2 n}}
\tag{1.1}
$$
\begin{equation}
\max _{\theta} \mathbb{E}_{\mathbf{z} \sim \mathcal{Z}_{T}}\left[\sum_{t=1}^{T} \log p_{\theta}\left(x_{z_{t}} | \mathbf{x}_{\mathbf{z}_{<t}}\right)\right]
\tag{1.2}
\end{equation}
化学图表公式 (SMILES)
化学公式可以使用 SMILES 语法表示。
SMILES 公式可以通过
<smiles>OC(=O)c1cc(Cl)cs1</smiles> 或通过以下方式以块模式内联呈现:```smiles
OC(=O)c1cc(Cl)cs1
```
其结果为:
标题、章节、摘要(LaTeX)
| LaTeX syntax | Markdown equivalent | HTML equivalent |
\title{My Title} |
# My Title |
<h1 align="center">My Title</h1> |
\author{Author's Name} |
No equivalent | No equivalent |
\begin{abstract}...\end{abstract} |
No equivalent | No equivalent |
\section{Section Title} |
## Section Title |
<h2>Section Title</h2> |
\subsection{Section Title} |
### Section Title |
<h3>Section Title</h3> |
\subsubsection{Section Title} |
#### Section Title |
<h4>Section Title</h4> |
注意:LaTeX
\title{} 将始终呈现居中对齐,而 <h1>...</h1> HTML 标签可以使用 align="..." 属性对齐,但使用 # 的 Markdown 标题将始终呈现左对齐。注意:在 Mathpix Markdown 中,您可以在文档中希望标题出现的任何位置使用
\title{} 命令,就像在 LaTeX 文档中使用 \maketitle 命令一样。标题(Markdown)
| Markdown | HTML | Rendered output |
|---|---|---|
# H1 Heading |
<h1>H1 Heading</h1> |
H1 Heading |
## H2 Heading |
<h2>H2 Heading</h2> |
H2 Heading |
## H3 Heading |
<h3>H3 Heading</h3> |
H3 Heading |
## H4 Heading |
<h4>H4 Heading</h4> |
H4 Heading |
## H5 Heading |
<h5>H5 Heading</h5> |
H5 Heading |
## H6 Heading |
<h6>H6 Heading</h6> |
H6 Heading |
H1 Heading===== |
<h1>H1 Heading</h1> |
H1 Heading |
## H2 Heading---- |
<h2>H2 Heading</h2> |
H2 Heading |
字体 (Markdown)
| Markdown | HTML | Rendered output |
|---|---|---|
**This is bold text** |
<b>This is bold text</b> |
This is bold text |
__This is also bold text__ |
<strong>This is bold text<strong> |
This is also bold text |
*This is italic text* |
<i>This is bold text</i> |
This is italic text |
_This is also italic text_ |
<em>This is bold text</em> |
This is also italic text |
~~Strikethrough~~ |
<s>Strikethrough</s> |
|
==This is marked text== |
<mark>This is marked text</mark> |
This is marked text |
字体 (LaTeX)
| LaTeX syntax | Markdown equivalent | HTML equivalent |
\textit{italicized text} |
*italicized text* or _italicized text_ |
<i>italicized text</i> or <em>italicized text</em> |
\textbf{bold text} |
__bold text__ |
<b>bold text</b> or <strong>bold text</strong> |
\url{link} |
[link text](url) |
<a href="url">link text</a> |
列表 (Markdown)
以
+、- 或 * 作为行首,创建无序列表+ Sub-lists are made by indenting 2 spaces:
- Different characters in in the same sub-list will render the same characters:
* Ac tristique libero volutpat at
+ Facilisis in pretium nisl aliquet
- Nulla volutpat aliquam velit
+ Very easy!
- Sub-lists are made by indenting 2 spaces:
- Different characters in in the same sub-list will render the same characters:
- Ac tristique libero volutpat at
- Facilisis in pretium nisl aliquet
- Nulla volutpat aliquam velit
- Different characters in in the same sub-list will render the same characters:
- Very easy!
通过写入 1、2 等来创建有序列表。
1. Lorem ipsum dolor sit amet
2. Consectetur adipiscing elit
3. Integer molestie lorem at massa
- Lorem ipsum dolor sit amet
- Consectetur adipiscing elit
- Integer molestie lorem at massa
1. You can use sequential numbers...
1. ...or keep all the numbers as 1 and it will automatically increment your list.
- You can use sequential numbers…
- …or keep all the numbers as 1.
Or start your list with any number and the numbering will continue:
57. foo
2. bar
6. foo
- foo
- bar
- foo
列表 (LaTeX)
您还可以使用 LaTeX 样式
\begin{itemize} ... \end{itemize} 环境创建列表。例如:
\begin{itemize}
  \item One entry in the list
  \item Another entry in the list
\end{itemize}
- •One entry in the list
- •Another entry in the list
您可以在此处阅读此类列表的完整描述(lists.md)。
提示
您可以使用
+++ ... +++ 创建提示,即可折叠部分。例如:
+++ Click me...
Hello, world!
+++
Click me...
Hello, world!
请注意,您希望在展开按钮旁边显示的任何文本都应与第一个
+++ 位于同一行。代码
将内联代码
用单个反引号 (`) 包装起来…或将代码块用三个反引号 (```) 或三个波浪符号 (~~~) 包装起来
var foo = function (bar) {
  return bar++;
};
在前三个反引号或波浪号后包含编程语言,以便语法突出显示:
var foo = function (bar) {
  return bar++;
};
(通过 highlight.js 支持所有主要语言。)
您还可以通过缩进所有行来创建代码块:
    \\ some comments
    line 1 of code
    line 2 of code
    line 3 of code
将呈现:
\\ some comments
line 1 of code
line 2 of code
line 3 of code
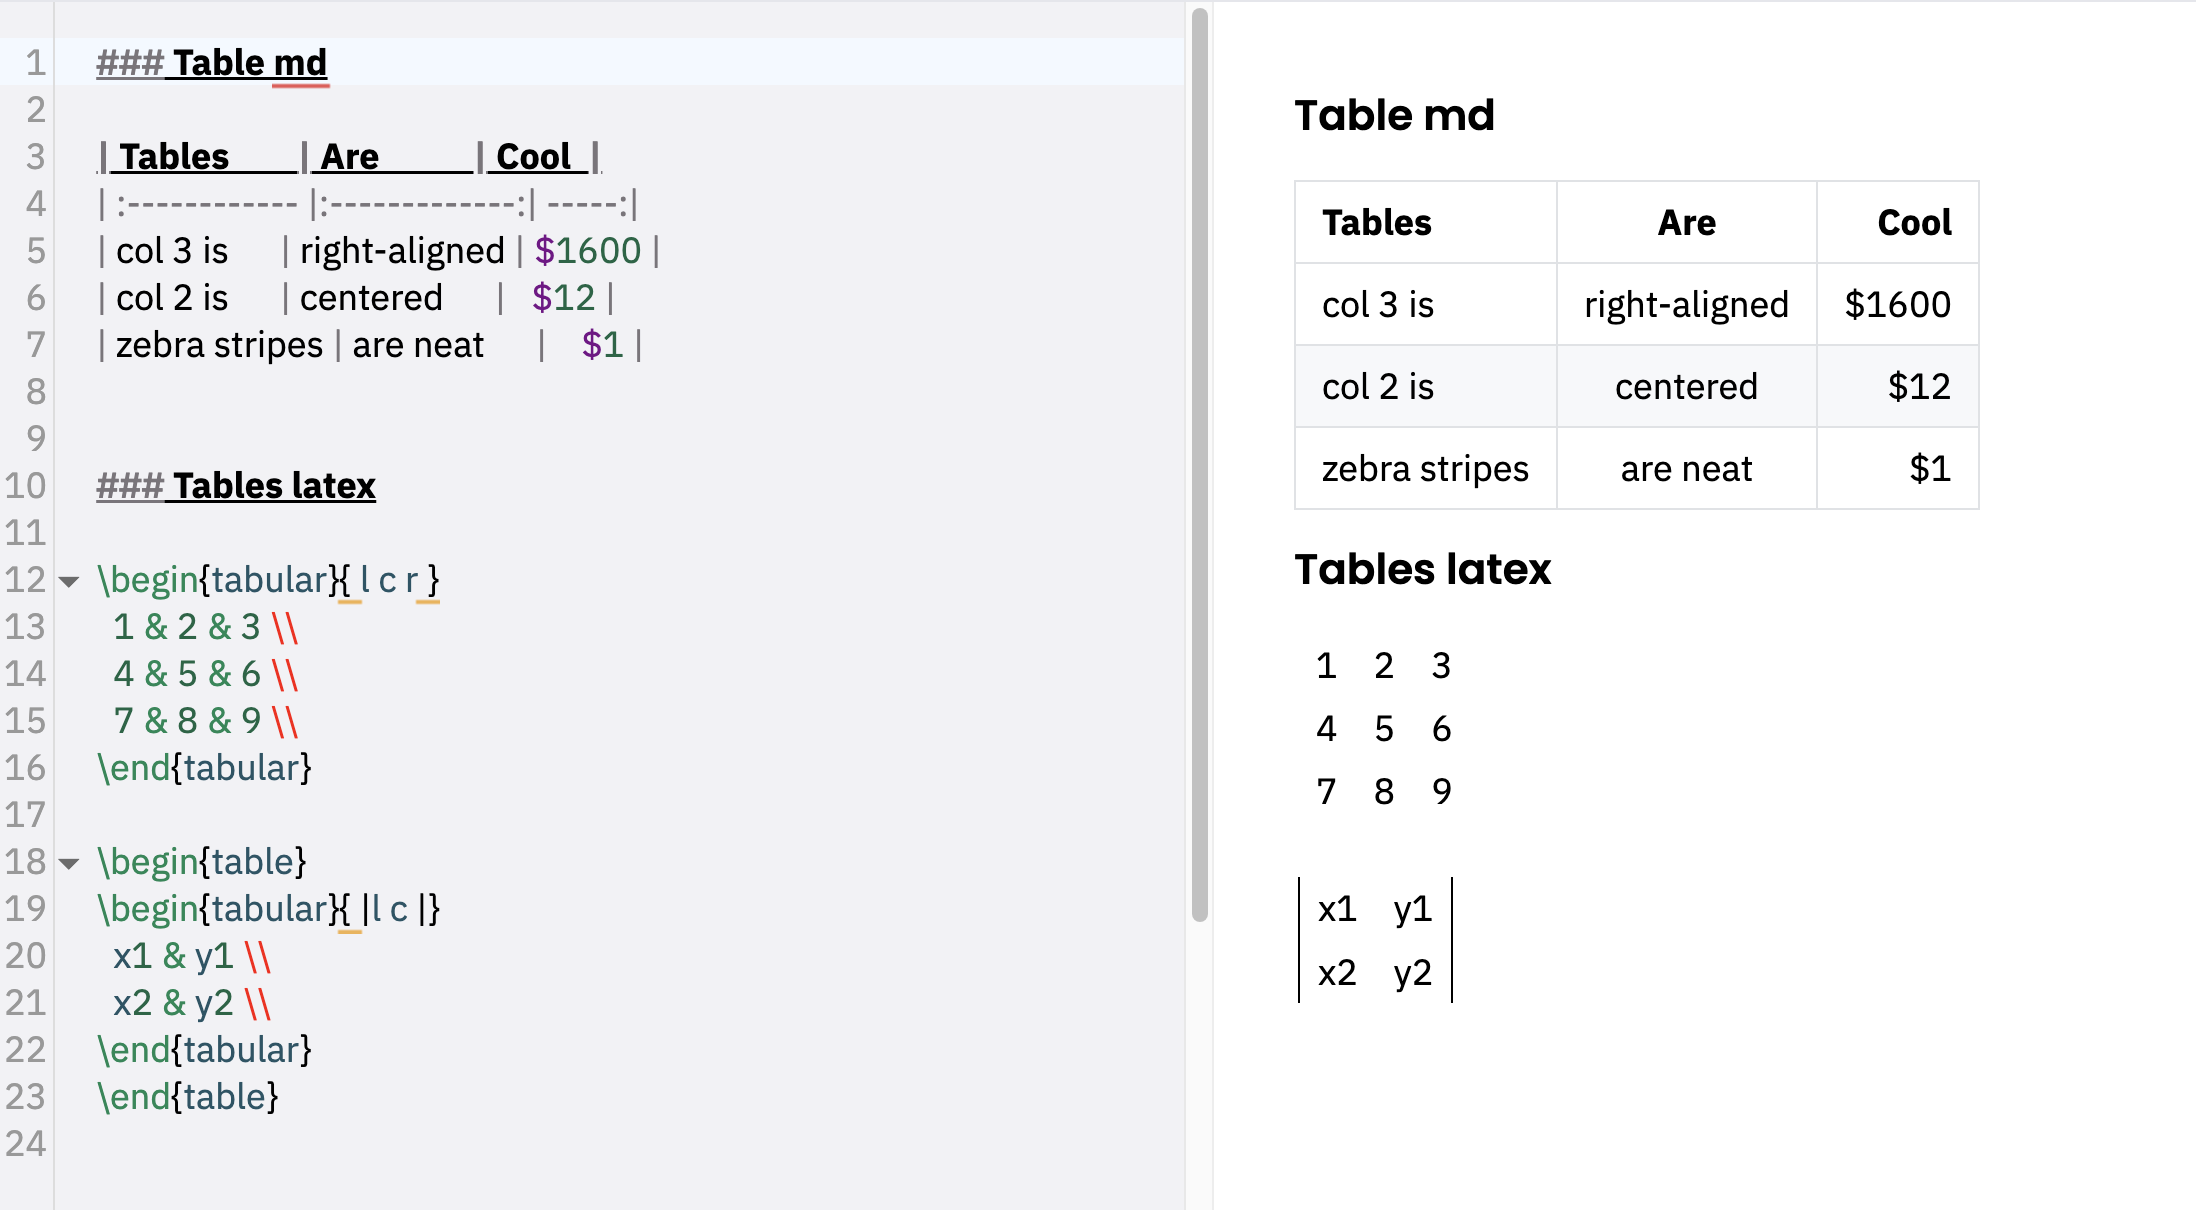
表格(Markdown)
冒号可用于对齐列:
| Tables        | Are           | Cool  |
| :------------ |:-------------:| -----:|
| col 3 is      | right-aligned | $1600 |
| col 2 is      | centered      |   $12 |
| zebra stripes | are neat      |    $1 |
| Tables | Are | Cool |
|---|---|---|
| col 3 is | right-aligned | $1600 |
| col 2 is | centered | $12 |
| zebra stripes | are neat | $1 |
每个标题单元格之间必须至少有 3 个破折号。
外部管道 (
外部管道 (
|) 是可选的,您不需要让原始 Markdown 排列得很漂亮:Markdown | Less | Pretty
--- | --- | ---
*Still* | `renders` | **nicely**
1 | 2 | 3
| Markdown | Less | Pretty |
|---|---|---|
| Still | renders |
nicely |
| 1 | 2 | 3 |
表格 (LaTeX)
tabular 环境是一个强大且重要的 LaTeX 命令,它为表格渲染和多行/列跨单元格提供了许多选项。语法如下:\begin{tabular}{<<table spec>>} <<table content>> \end{tabular}
此示例显示如何在 LaTeX 中创建表格。
    \begin{tabular}{| l | l | l | l |}
    \hline
    Day & Min Temp & Max Temp & Summary \\ \hline
    Monday & 11C & 22C & A clear day with lots of sunshine.
    However, the strong breeze will bring down the temperatures. \\ \hline
    Tuesday & 9C & 19C & Cloudy with rain, across many northern regions. Clear spells
    across most of Scotland and Northern Ireland,
    but rain reaching the far northwest. \\ \hline
    Wednesday & 10C & 21C & Rain will still linger for the morning.
    Conditions will improve by early afternoon and continue
    throughout the evening. \\
    \hline
    \end{tabular}
| Day | Min Temp | Max Temp | Summary |
| Monday | 11C | 22C | A clear day with lots of sunshine. However, the strong breeze will bring down the temperatures. |
| Tuesday | 9C | 19C | Cloudy with rain, across many northern regions. Clear spells across most of Scotland and Northern Ireland, but rain reaching the far northwest. |
| Wednesday | 10C | 21C | Rain will still linger for the morning. Conditions will improve by early afternoon and continue throughout the evening. |
阅读 LaTeX 表格支持完整指南 了解更多信息。
默认情况下,呈现的 HTML 中的所有表格都将居中对齐(除非为这些表格设置了其他对齐方法):
引用
使用
> 编写块引用,如下所示:> This is my blockquote
This is my blockquote
> This is my blockquote,
> It's taking up two lines.
This is my blockquote,
It’s taking up two lines.
> This is my nested blockquote,
>> it's pretty nifty.
This is my nested blockquote,it’s pretty nifty.
链接
使用
[Title](url) 语法插入链接:[This is a link to the Mathpix website](http://mathpix.com/)
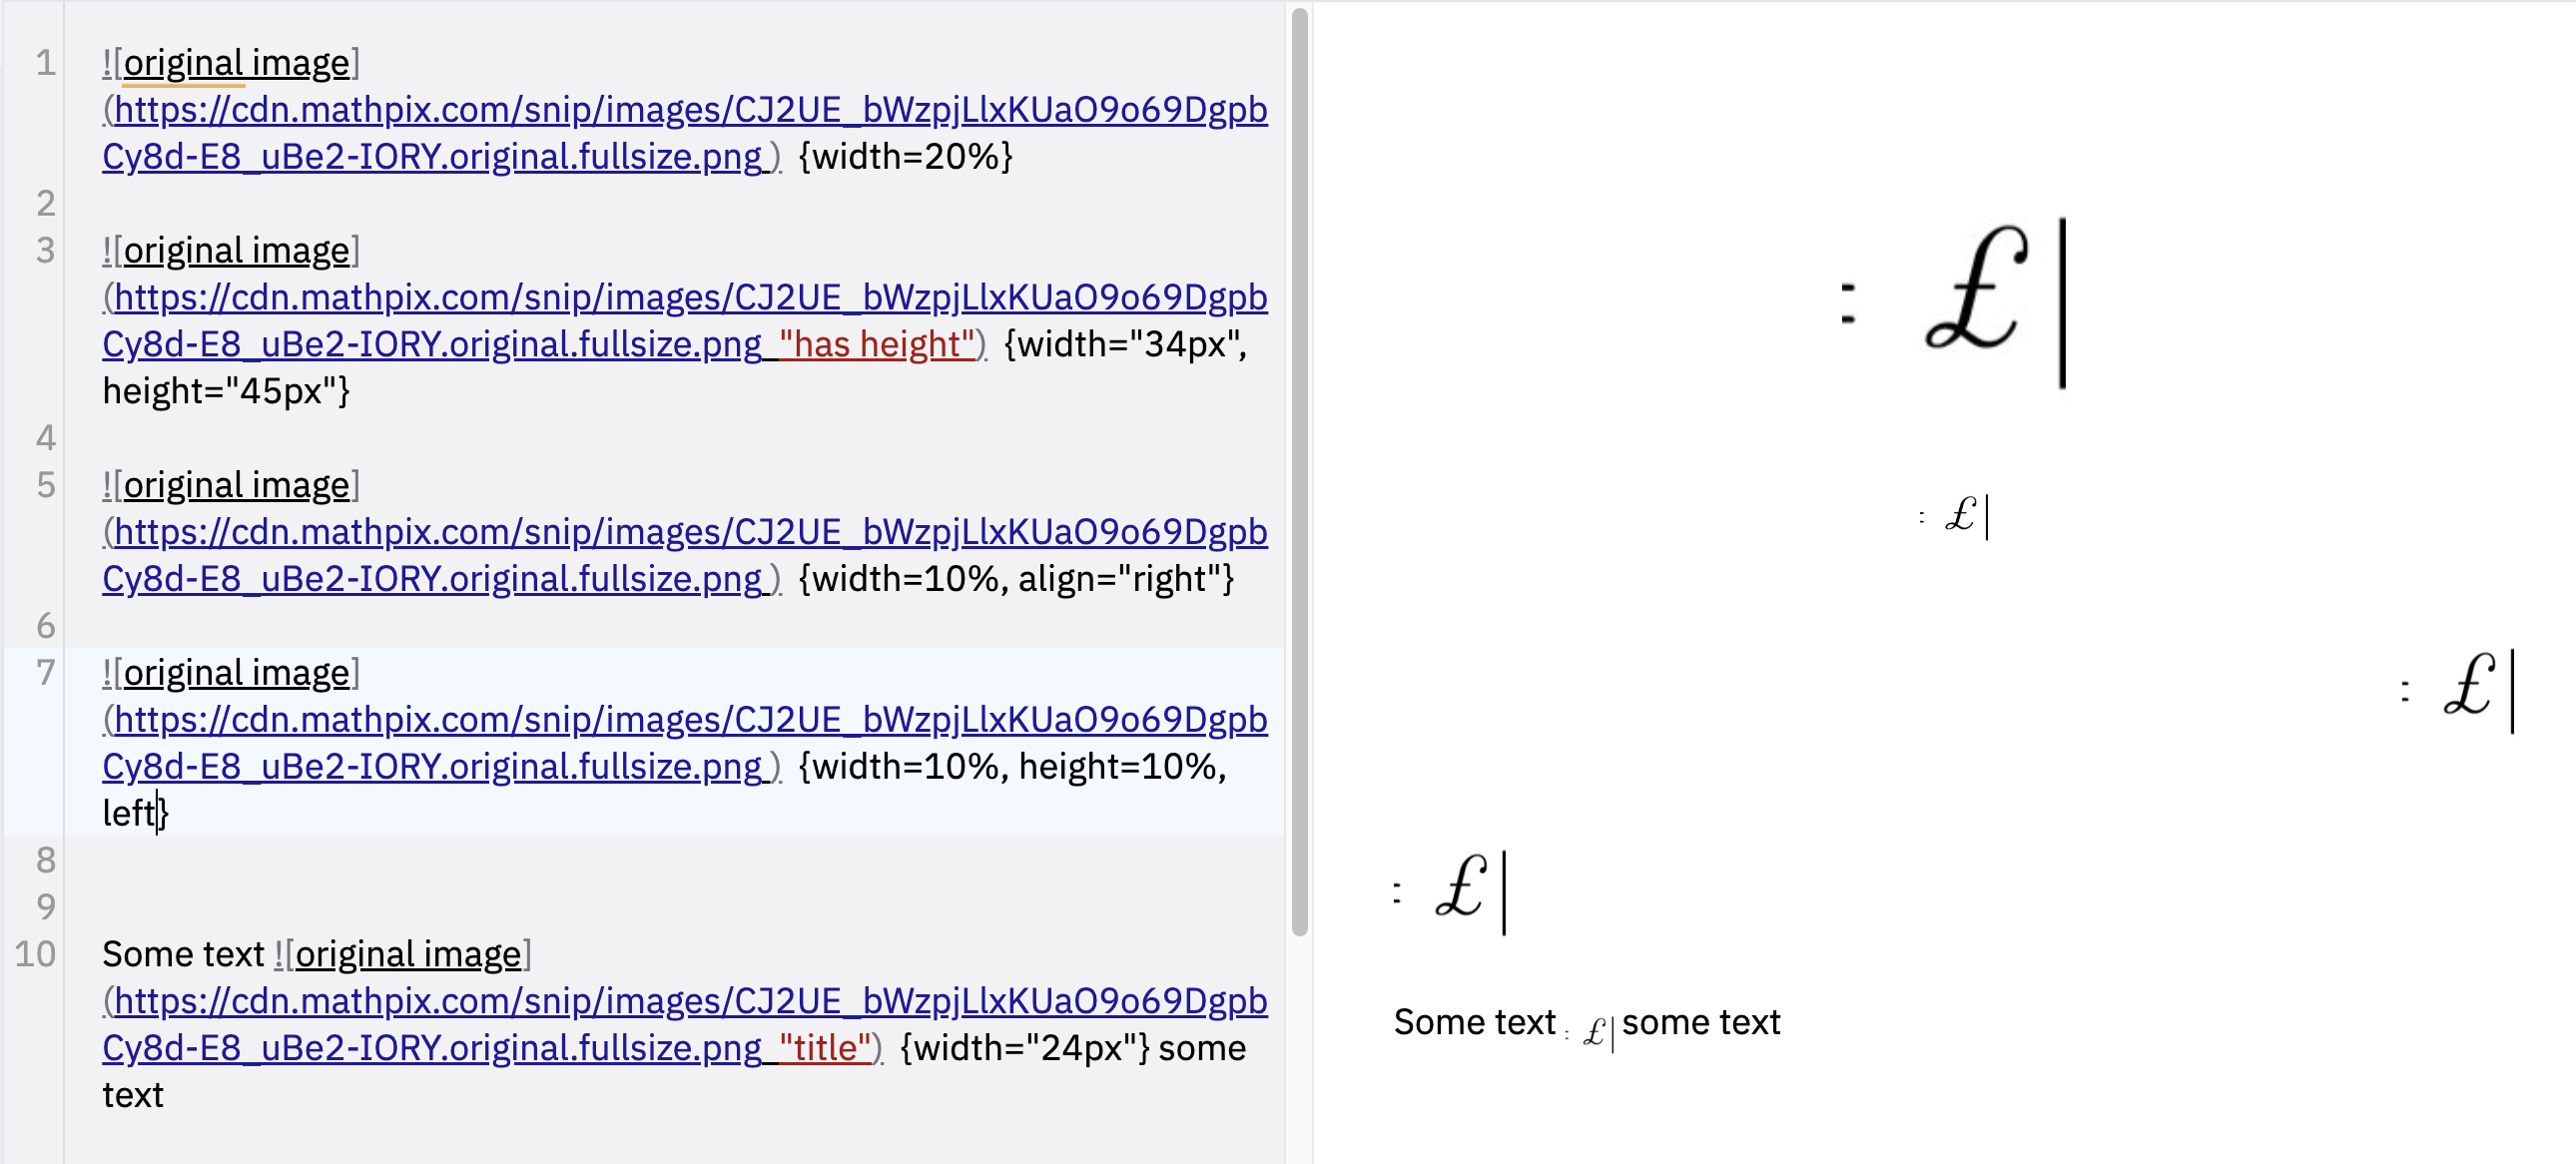
图片 (Markdown)
使用
 语法插入图片: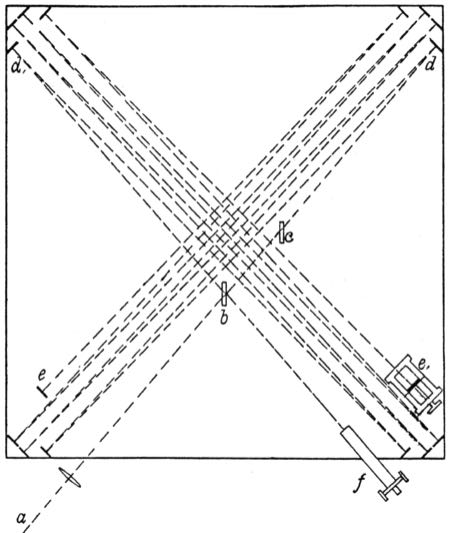

在工具提示的 URL 后面的引号中包含文本(将鼠标悬停在图像上即可查看):

解析并渲染宽度、高度、对齐等附加参数:
{ width=50% }
{ width="36px" }
{width="20px",height="20px"}
{width="20px",height="20px",right}
{width="20px",height="20px", align="left"}
图像 (LaTeX)
您还可以使用 LaTeX 的“figure”环境插入图像。
例如:
\begin{figure}[h]
\includegraphics[width=0.5\textwidth, center]{https://cdn.mathpix.com/snip/images/MJT22mwBq-bwqrOYwhrUrVKxO3Xcu4vyHSabfbG8my8.original.fullsize.png}
\end{figure}
您可以在此处阅读有关如何使用的完整说明(figures.md)。
默认情况下,渲染的 HTML 中的所有图像都将居中对齐(除非为这些图像设置了其他对齐方法):
脚注
您可以通过写出“第一”、“第二”、“第三”等来写脚注:
Footnote 1 link[^first]
Footnote 1 link[1]
Footnote reference[^second]
Footnote reference[2]
您可以像这样再次引用同一个脚注:
My reference[^second]
My reference[2:1]
或者你也可以使用数字:
This is my next footnote[^3]
This is my next footnote[3]
You can reference multiple footnotes in a row[^3][^4]
您还可以编写内联脚注:
Inline footnote^[Text of inline footnote] definition.
Inline footnote[5] definition.
滚动到页面底部查看这些脚注的呈现方式:
[^first]: Footnotes **can have markup**

    and multiple paragraphs.

[^second]: Footnote text.

[^3]: Hello I am the third footote!

[^4]: And I'm the 4th!
水平分隔线
创建如下水平规则:
___
---
***
分页
您可以使用
\pagebreak 命令来启用分页。将文档转换为 LaTeX、PDF(使用 LaTeX)和 DOCX 格式时会反映这些分页符。杂项
以下是支持的其他一些符号:
(c) (C) (r) (R) (tm) (TM) (p) (P) +-
© © ® ® ™ ™ § § ±
Punctuation will get autocorrected:
test.. test... test..... test?..... test!....
test… test… test… test?.. test!..
!!!!!! ???? ,, -- ---
!!! ??? , – —
表情符号
经典标记:
:wink: :cry: :laughing: :yum:
😉 😢 😆 😋
快捷方式(表情符号):
:-) :-( 8-) ;)
😃 😦 😎 😉
下标和上标
19^th^
19th
H~2~O
H2O
使用 HTML
您也可以使用 HTML 标签。以下是标题的示例:
<h2 style="color:blue;">This is a Blue Heading</h2>
This is a Blue Heading
You can also render SVGs!
<svg id="function random() { [native code] }" xmlns="http://www.w3.org/2000/svg" version="1.1" width="200px" height="150px" viewBox="0 0 200 150">\n\t<style> #function random() { [native code] } {pointer-events:none; } #function random() { [native code] } .event { pointer-events:all;} </style>\n\t<text x="136" y="79" font-family=" Helvetica" font-weight="900" font-size="14" fill="rgb(255,13,13)">O</text>\n\t<text x="115" y="43" font-family=" Helvetica" font-weight="900" font-size="14" fill="rgb(255,13,13)">O</text>\n\t<text x="126" y="43" font-family=" Helvetica" font-weight="900" font-size="14" fill="rgb(255,13,13)">H</text>\n\t<text x="73" y="42" font-family=" Helvetica" font-weight="900" font-size="14" fill="rgb(255,13,13)">O</text>\n\t<text x="84" y="42" font-family=" Helvetica" font-weight="900" font-size="14" fill="rgb(255,13,13)">H</text>\n\t<line x1="118" y1="64" x2="134" y2="72" style="stroke:rgb(0,0,0);stroke-width:1"/>\n\t<line x1="120" y1="60" x2="136" y2="69" style="stroke:rgb(0,0,0);stroke-width:1"/>\n\t<line x1="79" y1="63" x2="100" y2="75" style="stroke:rgb(0,0,0);stroke-width:1"/>\n\t<line x1="79" y1="67" x2="95" y2="76" style="stroke:rgb(0,0,0);stroke-width:1"/>\n\t<line x1="58" y1="99" x2="58" y2="74" style="stroke:rgb(0,0,0);stroke-width:1"/>\n\t<line x1="62" y1="96" x2="62" y2="77" style="stroke:rgb(0,0,0);stroke-width:1"/>\n\t<line x1="99" y1="99" x2="79" y2="111" style="stroke:rgb(0,0,0);stroke-width:1"/>\n\t<line x1="95" y1="97" x2="79" y2="106" style="stroke:rgb(0,0,0);stroke-width:1"/>\n\t<line x1="120" y1="46" x2="120" y2="63" style="stroke:rgb(0,0,0);stroke-width:1"/>\n\t<line x1="100" y1="75" x2="120" y2="63" style="stroke:rgb(0,0,0);stroke-width:1"/>\n\t<line x1="79" y1="45" x2="79" y2="63" style="stroke:rgb(0,0,0);stroke-width:1"/>\n\t<line x1="58" y1="74" x2="79" y2="63" style="stroke:rgb(0,0,0);stroke-width:1"/>\n\t<line x1="79" y1="111" x2="58" y2="99" style="stroke:rgb(0,0,0);stroke-width:1"/>\n\t<line x1="99" y1="99" x2="100" y2="75" style="stroke:rgb(0,0,0);stroke-width:1"/>\n\t<line id="function random() { [native code] }:Bond:1-0" class="event" x1="120" y1="63" x2="141" y2="75" stroke-width="8" stroke-opacity="0"/>\n\t<line id="function random() { [native code] }:Bond:4-3" class="event" x1="79" y1="63" x2="100" y2="75" stroke-width="8" stroke-opacity="0"/>\n\t<line id="function random() { [native code] }:Bond:7-6" class="event" x1="58" y1="99" x2="58" y2="74" stroke-width="8" stroke-opacity="0"/>\n\t<line id="function random() { [native code] }:Bond:9-8" class="event" x1="99" y1="99" x2="79" y2="111" stroke-width="8" stroke-opacity="0"/>\n\t<line id="function random() { [native code] }:Bond:2-1" class="event" x1="120" y1="39" x2="120" y2="63" stroke-width="8" stroke-opacity="0"/>\n\t<line id="function random() { [native code] }:Bond:3-1" class="event" x1="100" y1="75" x2="120" y2="63" stroke-width="8" stroke-opacity="0"/>\n\t<line id="function random() { [native code] }:Bond:5-4" class="event" x1="79" y1="38" x2="79" y2="63" stroke-width="8" stroke-opacity="0"/>\n\t<line id="function random() { [native code] }:Bond:6-4" class="event" x1="58" y1="74" x2="79" y2="63" stroke-width="8" stroke-opacity="0"/>\n\t<line id="function random() { [native code] }:Bond:8-7" class="event" x1="79" y1="111" x2="58" y2="99" stroke-width="8" stroke-opacity="0"/>\n\t<line id="function random() { [native code] }:Bond:9-3" class="event" x1="99" y1="99" x2="100" y2="75" stroke-width="8" stroke-opacity="0"/>\n\t<circle id="function random() { [native code] }:Atom:0" class="event" cx="141" cy="75" r="8" fill-opacity="0"/>\n\t<circle id="function random() { [native code] }:Atom:1" class="event" cx="120" cy="63" r="8" fill-opacity="0"/>\n\t<circle id="function random() { [native code] }:Atom:2" class="event" cx="120" cy="39" r="8" fill-opacity="0"/>\n\t<circle id="function random() { [native code] }:Atom:3" class="event" cx="100" cy="75" r="8" fill-opacity="0"/>\n\t<circle id="function random() { [native code] }:Atom:4" class="event" cx="79" cy="63" r="8" fill-opacity="0"/>\n\t<circle id="function random() { [native code] }:Atom:5" class="event" cx="79" cy="38" r="8" fill-opacity="0"/>\n\t<circle id="function random() { [native code] }:Atom:6" class="event" cx="58" cy="74" r="8" fill-opacity="0"/>\n\t<circle id="function random() { [native code] }:Atom:7" class="event" cx="58" cy="99" r="8" fill-opacity="0"/>\n\t<circle id="function random() { [native code] }:Atom:8" class="event" cx="79" cy="111" r="8" fill-opacity="0"/>\n\t<circle id="function random() { [native code] }:Atom:9" class="event" cx="99" cy="99" r="8" fill-opacity="0"/>\n</svg>